
WHOOO HOOOO I got my fall swap goodies and boy oh boy did I get the mother load!!!!!
Lookie lookie at all that I got!!!!!!
But ya want to know what is even better than all of this????
The wonderful friend I have found thru this swap!!!
My now new bestest buddy Deb, from http://www.crowsonthecupola.blogspot.com/
I have been running all over my house setting out my new fall decorations. The Pumpkin Pie on my oak table, The HANDSTITCHED pillows Deb made are in my cupboard, The little hand painted trinklet box fits nicely on one of my shelfs, the candy corn,,, I LOVE the candy corn she made for me, they are in my kitchen, The Harvest Pumpkin is greeting my guests in the entry way, And look at the sign!!! What a HOOT!
"May all your pumpkins be PLUMP"! OMG!! How cute is THAT???
I LOVE all of it. Thank-you so very much Deb for all my goodies. I love every item I got,,and the work... the detail that went in to these pieces..wonderful.. lordy the time in them. Deb's workmanship is perfect!!! I should say Spellfully Purrfect! LOL!! ( That's a special thank you Deb,,You KNOW what I mean...giggles!)
Your's is on it's way Monday. I'm late but I hope it will be worth it.
Thank-you Char for hosting this swap!!!!

 Please drill some pilot holes so you don't crack the wood..We got this far ,,we don't want to ruin it now.......
 Now flip it over and nail the back.


 MY 3 holes are drilled and I'm ready to put the nails in.
 Flip it over and put your nails in the back. I put 7 nails across the top.


 OK>>> Here the wallpaper it fits in and we are ready to paint the shelf.. I am doing my black.
 Paint the whole back black. Paint everything black on the front except all the middle where the wall paper will go. Plaint about a 1/2 inch edge on the plywood where the wallpaper will be glued..You are doing this in case when you trimmed the wall paper , if you took too much off , the black will make it not so noticable.
 And now we can sand our shelf..and stain it..sand it till the wood shows thru in places. When the black is dry, you can paint a second color like red or mustard and sand thru to the black in places and all the way thru to the wood also in places. I used minwax a dark walnut stain.. I rubbed it on with a rag and wiped it off. After it is dry..you can FINALLY glue your wall paper border in. I put white glue around the very edges where I painted the black in the plywood front.. Just so I was sure the wall paper didn't lift.. Other wise I just wet the back of the wall paper as I would if I were putting it on a real wall.
 YEA!!! WHOO HOO Here it is all finished.. This one I didn't not put knobs on it. It has the dark walnut stain finish..Now all ya have to do is put some hanging hooks on the back and figger out where you want to hang it in your home.... I made 3 shelfs during this tutorial..so that is why some had knobs and some didn't. I hope you were able to follow me here.. I wanted to show you that you can make a shelf using ANY size of wall paper border that you want. By starting with the wallpaper itself and going from there by drawing a line around it on plywood.. You can just built it right up from almost nothing.
 Here is the front side of the plywood I am going to use...Nasty ain't it..ok..not for long!!
 Take your wall paper border and select the part you want to use.. Wall paper border repetes so look for a place to cut where you have the whole picture with out over lapping the picture on the ends. I got this at Menards and it cut real nice between the houses. Cept I think it's printed at an angle?? Whatever..OK get your piece of wall paper border cut..Size does not matter. Any size border will work for this project.
 Now lay the wallpaper down on the BACK side of the plywood DON'T GLUE IT!!! just set it down..... We will be using new boards for the frame so.... find a nice board.. I used a piece of trim I had laying around here.. it does not matter how wide it is only that it is exactly the same length as your wall paper picture. You can now measure the trim so it is the same length as the wall paper is long, mark a line and cut the trim. Lay the trim down EVEN with the bottom edge of the plywood, leaving a space on all 3 remaining sides. Lay the wall paper above it so it is touching the trim but not under it. Draw a line around the wall paper. Ok new boards are 3/4 of an inch thick sooo measure 3/4 of an inch from the wall paper line and trim draw a line 3/4 away up the sides and across the top.. Draw a 3/4 space.


 Bottom rim is even and 3/4 on the sides and top. You can sand the edges of the plywood to get rid of any splinters.
 Put a few nails thru the finished side into the trim..Make sure the nails are shorter than the thickness of your trim so they don't go all the way thru the trim. Make sure the bottom edge stays even and the side and top still have a 3/4 space.
 Flip your plywood back over and it should look like this now.. The trim is glued and nailed. You are now ready for the sides of the shelf. Get your new wood. I used 2....3/4 x 3 1/2 x 15 inch long piece as that is what I had. You need 2 pieces. One for each side of the shelf.


 Draw on the wood.
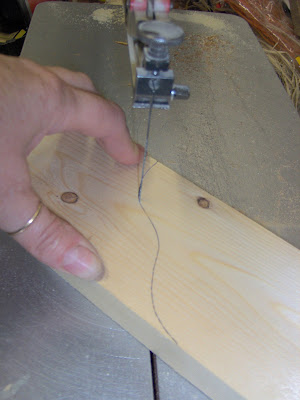 Cut it out on your scroll saw.
 Sand the sides and bang the edges on the end of the belt sander.. You can also sand it by hand..
 Hand sand too if you don't have a belt sander.
 Now lay the sides on the plywood in the 3/4 spaces you left on the sides of the wall paper. Measure so the side board is EVEN.........
 with the top of the wallpaper NOT THE TOP OF THE PLYWOOD. You need a 3/4 space at the top.. Draw a straight line and cut the board. Now sand the edges at the top.. And get your glue ready.
 Put some glue on the ends of the trim.
 Put the side piece on the plywood on the 3/4 space you left on the sides of the wall paper. And even with the top of the wallpaper. I'm gonna post this so I don't loose it and finish the shelf in part 2.